paynow3

 Carrier Financing Program
FinancingProvided LearnMore 250x90 A
 
cfad tag220px
paynow

Self HVAC Home Comfort Tips

HVAC Home Tips For Atlanta Homeowners

The Snow's Effect on Your HVAC System

The Snow’s Effect on Your HVAC System

Normal Ice Build Up on Heat Pumps

The first thing you should note is that not all snow and ice that is built up on an HVAC system is an emergency situation. In fact, in a heat pump, it’s a normal part of the operation especially on extremely frigid days. Heat pumps operate via a refrigerant that absorbs temperature from the Earth’s atmosphere. When the refrigerant absorbs heat excess moisture builds up on the processing coils and when the outside temperatures are at or near zero degrees that moisture freezes up almost instantly. You’ll notice the system run a little more sluggishly on those very brutal cold days but return to normal as the temps start to rise again.

How Falling Snow and Ice Wreaks HVAC Havoc

To be honest, even the ‘normal’ ice buildup on heat pumps and HVAC systems is somewhat rare. This is due mainly to the fact that the units are manufactured to account for this moisture freezing with an automatic defrost setting. When an ice buildup is detected the unit switches to a heat-distribution mode that melts the ice off the coils, all while backup heat keeps the house warm. It generally only takes 30 minutes for the defroster to do its job, but it needs air flow to do so. When snow has built up around the outdoor unit and ice has formed on top of the HVAC components can’t breathe and that defrost cycle doesn’t work – thus raising electricity usage, but more importantly putting incredible wear on the entire system.

Could it Cause Legitimate Damage to the HVAC System?

The most impending damage from snow and ice on an HVAC system is inefficient operation, but there are underlying problems that result as well. The main issue that arises when snow and ice encase the unit is that it triggers an emergency shut-off as the system freezes up. This cuts off heat to the home, which could cause burst pipes that result in property damage as the internal temperatures drop.

As far as physical damage to the outside units, most of the components are designed to withstand the elements in year-round exposure. It’s still possible for snow and ice to build up on the aluminum fan and coil fins and bend them, which would cause loud sounds while operating and will eventually bust the fins. Also, when components have to work twice as hard with a limited air flow, they end up short circuiting and burning out faster than expected.

Snow and Ice Maintenance

Protecting the HVAC system from Old Man Winter takes place at installation and continues during the life of the unit. Here are some guidelines that should be followed:

  • Don’t install outdoor units directly on the ground and instead far enough up from normal snowfall (6-10” minimum); most HVAC installers do this as a standard part of their installation procedure
  • Build a wind barrier with either shrubs or fences but remember to keep them far enough away for servicing and air flow
  • Keep the unit at least 18” away from the exterior wall to increase air passage and to avoid drifting exposure
  • Monitor your heat pump and outdoor HVAC systems in the winter. Snow buildup should be shoveled away, gutters should be inspected, so they’re not dripping on the unit, and ice should be melted away with warm water avoiding ice picks and possible damage to the system. If temperatures are still freezing out, warm water is often not a good choice as it will merely refreeze. In this case, let the defrost cycle run its course once or twice (give it an hour) or call an HVAC service technician.

Why Seal and Insulate?

Save Energy and Money.

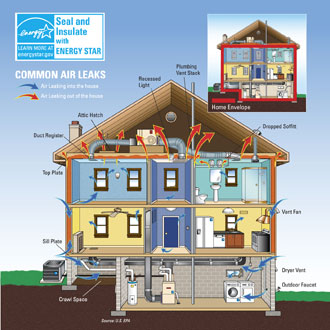
Air that leaks through your home's envelope − the outer walls, windows, doors, and other openings − wastes a lot of energy and increases your utility costs. A well-sealed envelope, coupled with the right amount of insulation, can make a real difference on your utility bills.

Increase Comfort.

Sealing leaks and adding insulation can improve the overall comfort of your home and help to fix many of these common problems:

  • Reduced noise from outside
  • Less pollen, dust and insects (or pests) entering your home
  • Better humidity control
  • Lower chance for ice dams on the roof/eves in snowy climates

Most Homes Will Benefit.

Most homes in the United States don't have enough insulation and have significant air leaks. In fact, if you added up all the leaks, holes and gaps in a typical home's envelope, it would be the equivalent of having a window open every day of the year!

                                                                                                                                                                                                 Common Air Leaks


Nest Thermostats Energy Savings Tips

There are several things that you can easily do using a Nest thermostat to help maximize energy savings - and help minimize your utility bills. Using just a few of these tips can make a big difference.

Teach it well

Your Nest Thermostat does almost all of the work for you. All you have to do is teach it what temperatures you like, especially during the first week you have it in your home. But even after it's created a schedule for you, it keeps learning from your adjustments over time.

Turn the temperature down at night

You're keeping warm under a thick blanket tonight, so turn the temperature down to save energy while you sleep. After a couple nights, Nest will learn this habit and start doing it for you.

Look for the Nest Leaf

The Nest Leaf is an easy way to know you're saving energy, and it encourages you to continually improve your savings over time. You'll see the Leaf on the Nest Thermostat display or in the app when you set it to a temperature that saves you energy. The more often you see a Leaf, the more you save.

Try an easy 1º change

On average, for every degree you set back your thermostat, you can save 2% on your energy bill. Most people can't tell the difference between a room set one day at 70º and the next day at 69º. In fact, the difference in temperature between your nose and your toes is likely to be greater than 1º. Try a small 1º change in your temperature schedule, and see how much you've saved compared to the previous month in your Home Report.

Set your "Away" temperature thoughtfully

Nest's Auto-Away and manual Away modes will both turn off your system until your home reaches a minimum or maximum temperature that you choose during setup, on in your thermostat Settings > Away Temperatures.

The more efficient your Away temperature is, the more you'll save. Just keep in mind the needs of pets and plants before you set it too low or high.

Manually set Away when you'll be gone for a long time

You should set your Nest Thermostat to Away manually for maximum savings when you're on vacation, a long business trip, or anytime you're away for an extended period. While Auto-Away will automatically maintain an energy efficient temperature while you're gone, if it senses activity, like a friend coming over to water the plants, it could start warming or cooling the house. Setting your thermostat to Away manually keeps your home at the same energy efficient temperature until you wake it up with the Nest app or by pressing the thermostat ring.

Cranking the heat won't warm your home faster

A thermostat is an on-off switch, not an accelerator. So for most heating systems, turning the temperature all the way up won't heat your home faster. It just runs your system longer. If you want it to be 72º inside and you turn the heat up to 90º, it will warm just as fast as if you turned the heat up to 72º.

When you change the temperature, make sure to look at Time-to-Temperature on the thermostat screen to get a sense of how high or low to set the temperature. You may not know if you want it to be 72° or 74°, but it's easy to see the difference between running the heat for 15 minutes versus an hour. You'll also see the results on your energy bill.

Check your Energy History

Just like a fitness tracker, Energy History shows you your energy use over time. You can view the last 10 days of your heating and cooling activity, and how your temperature choices, Auto-Away and the weather influenced your energy usage for instance. It's a great tool to build better habits to save even more in the future.

Use your fan sparingly

Using the fan of your heating and cooling system to make a house more comfortable sounds like a good idea. It uses less energy than your AC for instance and will do a good job at keeping the air a consistent temperature throughout your home to reduce hot and cold spots. However, keep in mind that the typical fan requires more energy than many homes use for lighting. If you keep the fan on all day, it will use as much energy as a typical air conditioner running for three hours straight. Over time, this can add up to a lot of unnecessary energy use.

Try using the fan control with your thermostat or the Nest app to schedule your fan to turn on for 15, 30, 45 or 60 mins each hour for a certain time period during the day.

Use windows to heat and cool your home

In many parts of the world, there are long periods of the year when you can harness Mother Nature's heating and air-conditioning power with your home's windows, blinds and curtains to help maintain the temperature you want. For example, if you live in a place with cool summer mornings and hot afternoons, you'll save a lot of energy by opening up the windows while it's cooler and closing the windows and blinds when the day starts to warm.

Try opening the windows at night, and don't use the AC in the morning. The next day, don't open the windows, and just use your thermostat to adjust the temperature. Look in Energy History on the third day to see the difference in how much energy you saved.

Use two or more thermostats the right way

If you have more than one thermostat in your home, teach them differently so that they build schedules for each part of your home that they control. You can save even more energy by closing the interior doors between the different areas of your home. This will help to keep the warm or cool air where you want it and prevent your system from switching on when it doesn't need to.

Adjust your radiators and vents

Any time you're overheating (or overcooling) one room just to be comfortable in another, you're using extra energy. If you find that some rooms in your home are too cold or too hot, try making gradual adjustments to the vents or to the radiators in each room - close the vents for a room that heats up too quickly (or cools down too quickly when running the air conditioning).

Take care of your heating and cooling system

Just like changing the oil in your car, regular maintenance of your system will make sure it's working as efficiently as it can. If your system has leaky ducts or an old air filter, it's probably wasting energy. The Nest Thermostat looks at how often your system runs to estimate when it's time to change the air filter and will send you a Filter Reminder when you're due. Changing a filter is usually straightforward and inexpensive - you'll need to check your equipment to see what size filter you need. You can change it yourself, or you can call a local Nest Pro at Self Heating and Cooling to do it for you. The Nest Pro at Self Heating & Cooling can also look at your system and fix any leaks that can affect efficiency. To schedule a Nest Pro, call Self Heating & Cooling at 678-909-6377


Tips for Buying and Using Dehumidifiers

Summer’s higher temps raise humidity levels in your home, and all that moist air can wreak havoc on interior walls and flooring. Too-high humidity promotes the growth of mold, mildew, and other allergens that take a toll on homeowners, too — especially asthma and allergy sufferers.

How Do I Know If My Home is Too Humid?
The EPA recommends keeping your home’s humidity under 60% during the summer and between 25% to 40% in the winter. You can pick up a hygrometer at your local hardware store for less than $25; it’ll measure the air’s moisture content.
But your own comfort — or discomfort — is one of the best indicators of off-kilter humidity. Coughing, sneezing, and clammy hands can all be signs that the air is too humid. 
Your home has a few ways of telling you, too:
  • Wonky wood: Hard-to-open wooden window frames and creaky, buckling hardwood floors are signs of swollen wood caused by too much moisture in your home.
  • Funky smells: A musty odor can indicate growth of moisture-loving mold and mildew.
  • Damaged walls: Peeling wallpaper, blistering paint, and dark spots on walls or the ceiling are all symptoms of excess humidity.
  • Constant condensation: Basic household activities like cooking and showering put moisture into the air, but if you’re seeing condensation on your windows long past bath time, your humidity level is probably too high.
What Are My Options for Dehumidifiers?
A dehumidifier pulls in wet air, removes moisture, and then exhausts the drier air back into your home.
There are two types of dehumidifiers: portable and whole-house. The type of dehumidifier that’s best for the job depends on the size of the space you want to dry out and how often you need to.
 
Portable Dehumidifiers
For one specific space, like a kitchen or a bedroom, a portable dehumidifier ($100 to $350) should do the trick. You can move it from room to room as needed during the months when moisture is a problem.
Some larger models (those with 30+ pint capacities) can be bulky to move, and with a portable you’ll have to empty the water tank each time it’s full. Fortunately, you don’t have to worry about overflow; most new models come with an automatic shutoff if the water tank gets full. Some units also have humidistats, timers, remote controls, and built-in wheels.
 
FYI:  Running your air conditioner can lower humidity in your home, but more effectively when temps are in the 80s or above. On days when the temps are in the 70s, your AC won’t be running enough to pull any significant amount of moisture out of the air. Without a dehumidifier, the air may still feel sticky even if temperature in your home is at a comfortable level.
 
Whole-House Systems
If you live in a climate where controlling humidity levels is a year-round battle, or you find yourself using multiple portable units, it may be time to install a whole-house system ($1,500 to $2,800), which can be integrated right into your HVAC.
There’s no tank to empty; a plastic tube and a run of PVC pipe carries water into a basement drain. If you don't have a basement, a condensate pump will route water outside or to another drain, often in a laundry room or bathroom. You’ll need a pro to install a whole-house dehumidifier.
Low-Tech DIY Options to Dehumidify
Or maybe you want to DIY — dry-it-yourself. You can dehumidify with some common household items, including:
  • Chalk
  • Kitty litter
  • Charcoal briquettes
  • Rock salt

These DIY solutions work best in small spots like closets or crawlspaces. Some do double duty, removing funky odors in addition to moisture.

Winter Humidification Tips

One of the biggest problems faced by people in the winter, aside from the frigid weather, is dry air. Little to no humidity in the air can cause dry skin, itchy eyes, and irritated sinuses and throat. Extended exposure to dry air can also inflame the mucous membrane lining in the respiratory tract – which can increase the risk of infection.

Negative Effects of Dry Air

  • Increased likelihood of getting sick and developing or aggravating respiratory problems.
  • Possibility of home damage to your wood furniture, walls, floors, and electronics.
  • Contributes to higher utility costs because dry air feels colder, prompting you to turn up the heat, which makes the air even drier.
  • Increased likelihood of bloody noses, static shocks, sore throats, allergies, asthma, and dry/itchy eyes, throat, and skin.

It’s the dry air that causes many of the health problems attributed to the cold weather during cold and flu season. This is why it is important to be mindful of the humidity levels in your home. Keeping the humidity at a healthy, comfortable level will help curb many of these symptoms.

What exactly is considered “healthy and comfortable?”

The Environmental Protection Agency recommends an indoor humidity level between 30 – 60%. But keeping these levels throughout the season requires a bit of juggling. The outside air naturally affects the humidity in your home whenever doors or windows are opened.

A typical forced-air heating system will also contribute to the low humidity by replacing the interior air with drier outdoor air. But humidity in the home when the outdoor temperature is freezing or below can lead to water and ice buildup on windows and, even worse, mold along the walls.

So, it’s important to find the ideal levels that won’t harm you or your home. A good rule to follow is that the lower the outside temperature, the lower your humidity should be. Most modern HVAC thermostats allow you to set the humidity level in your home, but a hygrometer (which can be found at any home improvement store) will also give an accurate measurement.

In order to get the best all-around results, indoor humidity levels should be adjusted according to the outside temperature. Here is a short tip-sheet for a home set at a comfortable 70 degrees:

  • Outside temperature 20-40 degrees: Indoor humidity level should not exceed 40%.
  • Outside temperature 10-20 degrees: Indoor humidity level should not exceed 30%. (Be mindful that a level under 30% can cause discomfort and the usual dryness symptoms. This is when a humidifier can come in handy.)
  • Outside temperature 0-10 degrees: Indoor humidity level should remain at 30% or slightly lower.
  • Outside temperature between -10 and 0 degrees: Indoor humidity level should not exceed 25%.
  • If you are unfortunate enough to live in an area where the outside temperature drops to 10-to-20 below, the humidity indoors must not exceed 20%. In this instance, a humidifier is essential in keeping you both comfortable and healthy.

Humidification Tips for Dry Winter Air

  1. Air dry your clothes to introduce humidity and save on energy costs.
  2. Open the door to your bathroom when showering or bathing.
  3. Houseplants help improve indoor air quality and release moisture into the air through transpiration.
  4. Fish tanks, indoor fountains, and standing water all add moisture to the air through evaporation.
  5. Opt for more stovetop cooking to introduce needed moisture.
  6. Your heating system contributes to dry indoor air, so lower the thermostat when you can. You’ll save on utility bills as well. 
  7. Seal and insulate your home to keep the cold, dry winter air out.

If you begin to see condensation on your windows, your humidity level is probably too high. Measure your home’s humidity levels with a hygrometer.

In addition to personal wellbeing, when the humidity levels are within the EPA’s recommended range, a home can heat much more efficiently. These levels allow for a lower thermostat setting, which will keep your HVAC system running less and lower your utility bill. This season, be mindful of the humidity levels in your home and enjoy a happier, healthier winter.

Whole-Home Humidification

Whole-home humidification is a great solution for maintaining healthy humidity levels. It is installed directly into your home’s central air unit and works for the entire house, rather than just a single room as with portable humidifiers.

An absorbent pad/perforated panel is installed directly into your system’s airflow to introduce much needed moisture into the air. Since it gets water from your main water line, there is no need to refill or drain it. Also, there is no need to turn it on or off since it uses a built-in humidity reader to determine when to humidify or dehumidify your home.

Call Self Heating & Cooling for your professional humidification and indoor air quality assessment and consultation.

specialoffers2
selfassurancepicnew2
BBB Logoa
reviewusongoogleplaces

About Self HVAC

1700 Cumberland Point Dr
Marietta, GA. 30067
Phone: (678) 909-6377
Fax: (678) 909-6378

Search